

Where are wooden beams usually used?
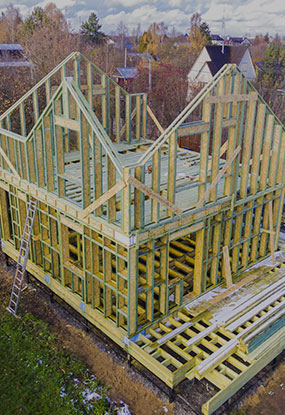
There is an opinion, even among professional builders, that wooden structures can be used either on very small spans of 4-5 meters, or already used in unique objects and some completely non-standard solutions, for example, if you need to cover a swimming pool, sports hall, exhibition area. And in that case we use bulky, heavy and expensive bent-glued structures. But the span interval from 6 to 12 meters is given to other materials -metal or reinforced concrete, or, if you need to use wood, builders prefer to reduce the spans to those values when you can use standard solutions.
In fact, the field of application of engineering wood materials is much wider than we used to think. It not only reaches 6 meters, but also covers the entire range up to 13 meters. Maybe more, but there is a question of transportation.
Any material suitable for large-span structures?
Of course, it is necessary to use not just wood in the form of boards or beams. If you make a bar of this length, it will be a glued bar and it will sag under its own weight. Or it will cost as a wing from an airplane. But the wood is good because it can be used not only directly as a solid bar, but it is easily processed, while not just maintaining its strength characteristics, but increasing them.
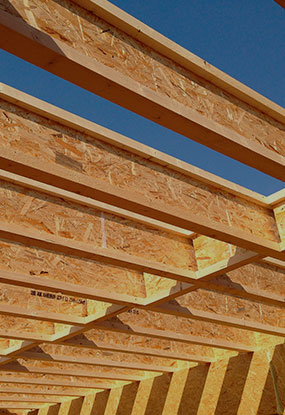
The ceiling, which will be considered as an example, is made of wooden I-Joists ICJ-900L-89.

The sequence of installation of beams:
- The ladder. Minimum of 2 pcs. (Or special equipment)
- Screwdrivers
- Open beam supports
- Structural corners 50x50 mm
- Structural self-tapping screws (galvanized or yellow) 80x6mm
- Construction level 2 pcs
- Structural self-tapping screws (galvanized or yellow) 35x4 mm
Step 1 Raising the material
In this case, a forklift is used to lift the beams, but this is a special case, 3-4 strong workers can lift such a beam to the ceiling. The weight of the linear meter of this beam is about 8 kg. Accordingly, the weight of the whole 13.5-meter beam is only 110 kg. It should be understood that in comparison with solid timber, metal or reinforced concrete beams, this weight is very small. Because the material capacity of I-Joists is small. In our case, one side of the beams rests on the wall, the other is adjacent perpendicular to the wall.

Step 2 Supporting beams to the perpendicular wall
One of the edges does not have a support on the wall, but is adjacent to it perpendicular wall. Therefore, to fix the edge of the beam to the wall, we use a special fastener – an open support of the beam. This is the so-called "boot", which is screwed on screws or anchors to the wall, and the bottom of the joist is installed in it. At the top, the joist is fixed to a corner to maintain its vertical position. For joists of cross-section like that, the corners are a temporary measure necessary for the installation stage. In the future, the upper shelf of the I-joists will be rigidly fixed with a flooring of slab material from above, and special block beams will be installed along the entire length.

Step 3 Leaning on the wall. Fixing with end block beams.
The opposite edge of the beam is mounted on the wall. We have a strapping bar made of planks along the wall, so we screw the lower shelf of the I-joist to the strapping with screws. In order to clamp and fix the edge in a vertical position, an end block beam is used. This is essentially the same I-beam, the same height as the main logs, only it can be made with shelves made of ordinary wood, and not from LVL timber. The end block beams are screwed to the wall through the lower shelf, and are also fixed with the help of corners at the top to the main logs.


Step 4 Install the block beams along the entire length of the main beams
After installation of the main beams, block beams are installed along the entire length with a step of no more than 3 meters. These connectors are necessary to give spatial rigidity and correct operation of the entire structure under load. The block beams are also mounted on the corners, but the corners are screwed to both the upper shelves and the lower ones.

For such tall and thin structures, additional stiffeners should be used to prevent the osb rack from crumpling. In parentheses, I note that they do the same for metal structures. The stiffeners are ordinary wooden bars.

Next, insulation will be laid between the beams, the ceiling will be sewn under the beams, and a flat roof will be laid over the beams.
If you suddenly hear that wooden structures are weak or you can't make something out of them, it just means that someone does not know how to select the right sections.